Master the Classic Custard Tart: Homemade Recipe for Silky Perfection
There are few desserts as universally cherished and comforting as the humble custard tart. With its golden, buttery crust encasing a filling so silky-smooth it practically melts in your mouth, this classic treat has captivated palates for centuries. While store-bought versions certainly have their charm, there's an unparalleled satisfaction and superior flavor that comes from mastering homemade custard tarts. This guide will take you through everything you need to know to create these delectable individual desserts, ensuring a perfect batch every time – ideal for sharing at parties or simply indulging yourself.A Rich History Baked into Every Bite
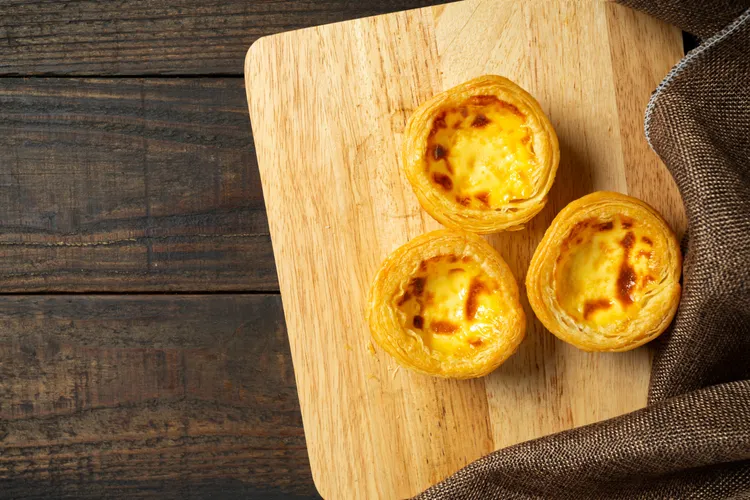
The story of custard tarts is a fascinating journey through culinary history, tracing its roots back to medieval Europe. These delightful treats made their mark particularly in England and Portugal, evolving from simpler, more rustic forms into the refined pastries we know and love today. The famed Portuguese Pastéis de Nata, with its characteristic caramelized spots, and the quintessential British custard tart, often dusted with nutmeg, are iconic examples that have inspired countless variations across the globe. Even in Asia, variations like the tangy cream cheese tart showcase the enduring appeal of a creamy filling nestled in a crisp pastry shell. This rich heritage speaks volumes about the timeless deliciousness of custard tarts – a dessert that truly transcends borders and generations.Why Homemade Custard Tarts Are a Game-Changer
While the convenience of a pre-made tart is undeniable, opting for a homemade approach unlocks a world of superior flavor and texture that simply cannot be replicated. Here's why making your own custard tarts is a truly rewarding endeavor:- Unmatched Flavor & Texture: The difference between fresh, homemade custard made with real eggs, milk, and cream versus a powder-based alternative is monumental. Homemade custard sets with an ethereal silkiness, almost like a delicate jelly, boasting a richness and depth that is truly unforgettable.
- Perfect for Gatherings: This particular recipe is designed for a large batch, yielding 24 individual tarts. This makes them an absolute showstopper for parties, family gatherings, potlucks, or any celebration where you need to impress a crowd without breaking a sweat.
- Customization at Your Fingertips: Homemade allows for endless creativity. While classic vanilla is divine, you can infuse your custard with lemon zest, orange blossom water, a hint of almond extract, or even cocoa powder for a chocolatey twist.
- Nutritional Boost: Beyond being a delightful treat, custard tarts offer some surprising nutritional benefits. The eggs provide a good source of protein, while the milk and cream contribute to your daily calcium intake, supporting strong bones.
- Pure Comfort & Joy: There's something inherently comforting about a creamy, sweet custard tart. It's a dessert that appeals to all ages, evoking feelings of warmth, nostalgia, and pure indulgence. Plus, the act of baking itself is incredibly therapeutic!
The Anatomy of Silky Perfection: Crust and Custard
Creating the ultimate custard tart involves a delicate balance between two key components: the crust and the filling. Each plays an indispensable role in achieving that coveted "silky perfection."The Buttery, Flaky Crust
A truly exceptional custard tart begins with its foundation: the pastry. You're aiming for a crust that is crisp, tender, and distinctly buttery, providing a beautiful textural contrast to the smooth filling. Using cold butter is paramount here, as it helps create those desirable flaky layers. Overworking the dough is the enemy of tenderness, so gentle handling is key. Blind baking the crust before adding the custard is also crucial to prevent a soggy bottom, ensuring your tart shells hold their shape and maintain their delightful crunch.
The Velvety, Rich Custard Filling
This is where the magic truly happens. The custard filling must be smooth, creamy, and wobble ever so slightly when gently nudged, indicating perfect doneness. A combination of egg yolks and whole eggs provides richness and structure, while cornstarch acts as a stabilizer, helping the custard set without becoming rubbery. The key to preventing lumps and ensuring that silky texture is to temper your eggs carefully and whisk continuously over medium heat until the custard thickens to the consistency of a thick pouring cream. Vanilla extract is a non-negotiable for that classic, aromatic flavor.
Mastering the Recipe: Your Step-by-Step Guide to 24 Perfect Custard Tarts
This large-batch recipe ensures you have plenty of these delightful custard tarts to go around.Ingredients (For 24 Custard Tarts)
For the Tart Crust:- 4 ½ cups all-purpose flour
- 1 cup powdered sugar
- 1 teaspoon salt
- 2 cups unsalted butter, cold and cubed (pro tip: ensure butter is very cold for flakiest results!)
- 2 large eggs
- 2 teaspoons vanilla extract
- 3 cups whole milk
- 2 cups heavy cream
- 1 ½ cups granulated sugar
- 8 egg yolks (these provide the deep yellow color and extra richness)
- 2 whole eggs
- 3 tablespoons cornstarch (your secret weapon for a stable, silky set)
- 2 teaspoons vanilla extract
- ½ teaspoon salt
Instructions
- Step 1: Crafting the Flaky Dough
- In a spacious mixing bowl, combine the all-purpose flour, powdered sugar, and salt.
- Add the cold, cubed butter to the dry ingredients. Using a pastry cutter, your fingertips, or a food processor, cut the butter into the flour until the mixture resembles coarse crumbs with some pea-sized pieces of butter remaining. This is crucial for flakiness!
- In a separate small bowl, lightly whisk the eggs with the vanilla extract. Add this wet mixture to the dry ingredients, mixing just until a cohesive dough forms. Be careful not to overmix, as this can lead to a tough crust.
- Divide the dough in half, flatten each half into a disc, wrap tightly in plastic wrap, and refrigerate for at least 30 minutes (or up to 2 days). This chilling period makes the dough easier to handle.
- Step 2: Preparing the Velvety Custard
- In a medium saucepan, gently heat the whole milk, heavy cream, and half of the granulated sugar over medium heat until it just begins to steam and bubbles appear around the edges – do not boil. Remove from heat.
- In a separate large bowl, vigorously whisk together the egg yolks, whole eggs, cornstarch, and the remaining granulated sugar until smooth and pale yellow.
- Gradually, and very slowly, pour about a cup of the warm milk mixture into the egg mixture while continuously whisking. This process, known as tempering, prevents the eggs from scrambling.
- Once tempered, pour the entire egg mixture back into the saucepan with the remaining warm milk.
- Return the saucepan to medium heat and cook, stirring constantly with a whisk or rubber spatula, until the custard thickens significantly and coats the back of a spoon (about 5-8 minutes). It should be thick but still pourable.
- Remove from heat, stir in the vanilla extract and salt. Pour the custard into a clean bowl, cover the surface directly with plastic wrap (to prevent a skin from forming), and let it cool completely. You can also refrigerate it once it has cooled to room temperature.
- Step 3: Shaping and Blind Baking the Shells
- Preheat your oven to 350°F (175°C). Lightly grease two standard 12-cup muffin tins.
- On a lightly floured surface, roll out one disc of chilled dough to an even ⅛ inch thickness.
- Using a round cookie cutter (approximately 3-inch diameter, or one that fits your muffin tins perfectly), cut out dough rounds. Gently press each round into the prepared muffin tin cups, ensuring they are evenly distributed up the sides.
- Prick the bottoms of the dough shells several times with a fork. This prevents air bubbles from forming and ensures a flat base.
- Bake the empty tart shells for 12–15 minutes, or until the edges are lightly golden. Remove from the oven and let cool slightly.
- Step 4: Filling and Final Bake for Silky Perfection
- Carefully spoon or pour the completely cooled custard filling into the par-baked tart shells, filling them almost to the brim.
- Return the filled tarts to the oven and bake for another 10–12 minutes. The custard should be set around the edges but still have a slight "jiggle" in the very center when gently shaken. Overbaking will result in a tough, rubbery custard.
- Remove from the oven and let the tarts cool completely in the muffin tins on a wire rack.
- Once cooled to room temperature, transfer the tarts to the refrigerator and chill for at least 2 hours (or ideally, overnight) before serving. This allows the custard to fully set and enhances the flavors.
